Friday, December 29, 2017

Sending Bear-Mail

Hi there!
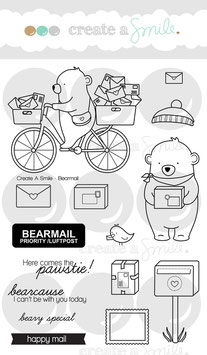
Samantha here today, and I'm sharing this cute, cute card with the adorable bear!!! eeee!


This little bear on the bike is sooooo adorable! I just had to use him on a card! Ha! And I love that this card can be used for Christmas, or even as a thank you card!!!! What fun!


Let's make this card together!

- using a straight mask (I used a piece of printer paper), do some ink blending for the background (I used Abandoned Coral Distress Oxide ink! Love that warm color!)
- stamp and color your image! I colored my image with Zig Clean Color Real Brush Markers!
- once it's dry, fussy cut out!


- then I splattered some water and ink color on top of the ink blending!

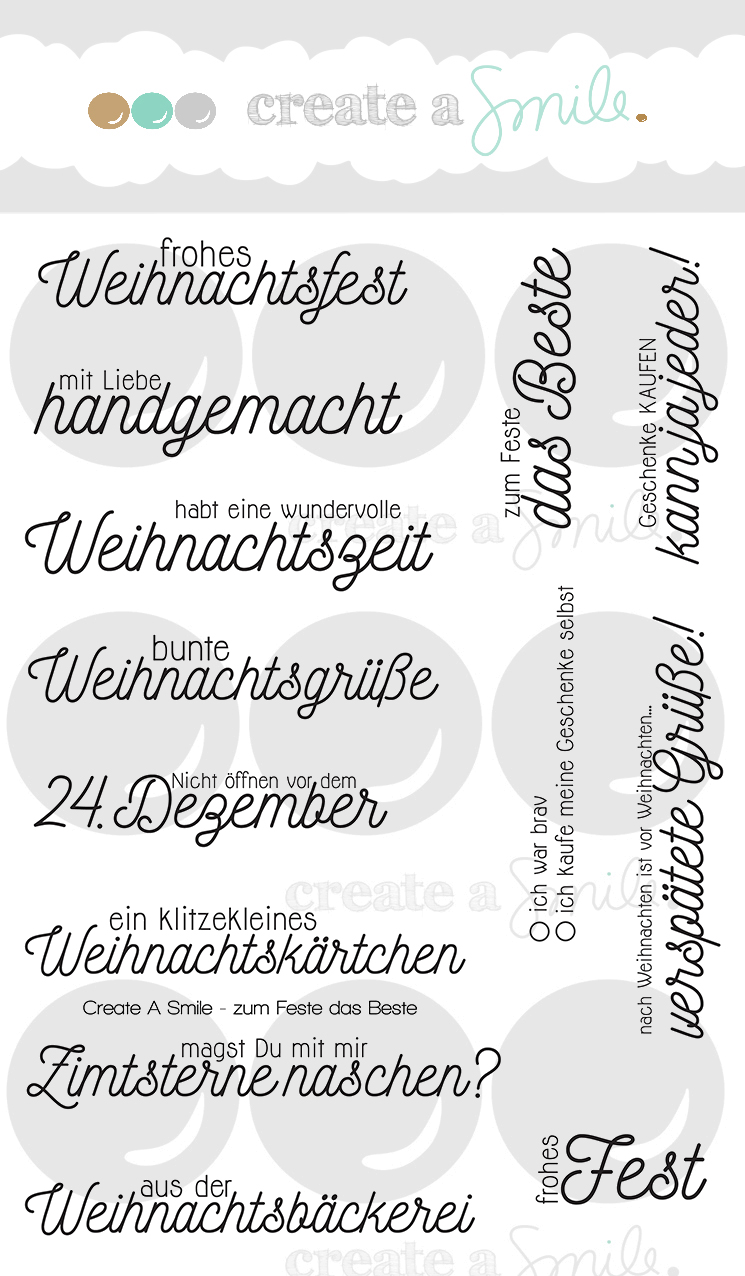
- I heat embossed the sentiment in black, combining phrases from two different sets! Love how versatile everything is!
- I added some white polka dots to the baskets on the bike for a fun, whimsical touch!


I used a craft knife to cut inside each spoke on the bike, but you totally don't have to do that! I just liked the look it gave! And it didn't take too long since it was mostly just straight lines! 


Seriously guys, this bear set...SO ADORABLE!! Everything on this card is from the Bear Mail stamp set, and I could use these little guys on every card, ever! LOL! Ooops, just kidding, part of the sentiment on the card is also from the Season's Greetings stamp set! 


Create a Smile stamps is growing!! Do you have a favorite store you want to sell Create a Smile Stamps!? tag them here and let us know!! 


~Samantha


Tuesday, December 26, 2017

Can't be with you

Merry Christmas and Happy Holidays to you all!
Welcome back to our crafty space.
Raluca here with a new card showcasing the absolutely adorable "Bear Mail" stamp set.


There is always a good friend or a family member that isn't near you at Christmas. This card is a perfect touch to your gift or you can send it as a happy mail.


Now let's talk about the process of making this card:

- I stamped all the images for the card, colored them using alcohol markers and colored pencils and fussy cut them. I stretched the bear stamp ad colored it as a cute Panda bear.
- I prepared a teal panel from cardstock and ink blended some Distress Ink Chipped Sapphire and Black Soot. I die cut some falling snow using a die from my stash. You can also use the fabulous "Winter Day" stencil from Create a Smile for the falling snow.
- I cut some snow hills from white cardstock and adhered them to the panel.
- I mounted all my images using foam tape and added a sentiment white embossed on a piece of white cardstock colored with alcohol markers matching the pink from my images.
- I glued the panel on a white card base leaving two white borders on the sides.
And my card was done. Love how this bear looks colored as a Panda!


Clear Bear Mail


If you love Instagram like I do, you can follow Create A Smile using the name @createasmilestamps and if you have any questions about card making, techniques or products or if you want to share your creations with Create A Smile fans join us on our Facebook group Create A Smile - Friends & Family :).

Have a lovely Tuesday!
Thanks for stopping by,
Raluca

Saturday, December 23, 2017

Heat Embossing Background Stamps

Hi Everyone!

Marika here with a new video tutorial. Today I have a Heat Emboss Background Stamps Technique, which is a very long name for something very quick and simple.


When I saw the Stars and Scribbles Backgroud Stamp I just fell in love and I knew I just had to have it, and being a just a day before Christmas (in Sweden we celebrate on Christmas Eve) I thought a quick and simple card was in order.


This card is super easy to make, and I made a video showing you step by step how I did. You can watch the video in HD HERE.


I recommend doing the blending on the edges at the very last, as then you don't need to wait for it to dry before adding the sentiment. One of the great things with embossing powder is that if you get any ink on it, you can use a dry or nearly dry cloth to wipe the ink off it when you are done.


Stars and Scribbles
Christmas Surprise
With Candles and Glitter

Friday, December 22, 2017

sending lots of joy!

Hi there!
Samantha here again, and I have one last holiday card to share!! 


This card was super fun, and easy to make!! A perfect design if you want to make more than one at a time!


Let's make this card!

- ink up the large, solid circle stamp with blue ink (I used Peacock Feathers Distress Oxide Ink) and stamp onto your card front
- clean the stamp.and using a water-based marker, loosely draw the continents of the world! I used Zig Clean Color Real Brush Markers, and as you can see, the shape of the countries don't have to be exact! Ha!
- stamp the colored green 'world' over your stamped blue circle! 


- next, stamp the stars image - my favorite!!
- once everything is dry, hear emboss part of the sentiment in white on top of the world image and the other half of the sentiment onto a strip of black cardstock
- pop up the strip of black cardstock with foam tape and add the sequins!


You can create so many fun images with the large, solid circle on this stamp set! I have so many ideas to try out! Just remember, when you're coloring/stamping onto that circle stamp, do it in the reverse!! Ha! My first 'globe' image turned out with the continents in the wrong hemispheres! ooops! 


I used the adoooooorable and super versatile Season's Greetings stamp set! LOVE it!!! I also used the super pretty Pretty Pink Posh Sparkling Clear Stars


We know the holidays are coming to close, but don't forget! You can use the same holiday images with a 'thank you' type sentiment!!! It's an awesome way to stretch your stamps! 


~Samantha

Thursday, December 21, 2017

Thank you and Merry Christmas

Hello crafty friends, Nicole here.

This is my last christmas card for this year. :-)


Our kids have two wonderful pediatrists (husband and wife). I wanted to say thank you and wish them a happy holiday season. These foxes are the cutest with that sweet little patch, just perfect for my card.


  1. spritz some white paint on some kraft paper
  2. tear a piece of white paper to create the snow
  3. glue the snow piece to the background and die cut them with a frame die
  4. stamp the foxes, color them and cut them out
  5. cut a little banner and add a sentiment with embossing powder
  6. adhere the foxes on your panel using foam tape
  7. stamp the greeting 
  8. add the banner to the panel using foam tape
  9. glue your panel to your card base
  10. add Glossy Accents to the center of the patch

doctors helpers / zum Feste das Beste / mini Danke

Thank you for visiting Create A Smile's Blog, MERRY CHRISTMAS and a crafty new year,

Wednesday, December 20, 2017

Last Minute Christmas Cards

Hey stampers, Anni here!

Christmas is just a few days away and I still haven't send out my Christmas cards. And I still needed some cards. That's the design I came up with.


Again I was looking for a card idea that was easy to make and doesn't take too long. But on the other hand it shouldn't look that way - if you know what I mean. I think the Negative Snowflake is the perfect die in this case.


These cards are really easy to make. Just follow these steps:

  • Die cut stitched rectangles from white cardstock.
  • Die cut the Negative snowflake from these rectangles.
  • Adhere some glitter cardstock to your cardbase.
  • Heat emboss the sentiment on a stripe of white cardstock.
  • Assembe the card.


  • For this kind of CAS cards it is very important that you use the same white cardstock for all the pieces so everything matches perfectly.
  • I change the design a little bit for the last card in the set: I used the chipboard snowflake from the Snow Dance kit and used kraft cardstock.

This is my last post for this year. So I want to wish you a very Merry Christmas and a happy New Year.
Anni


Tuesday, December 19, 2017

Delicate Decorations

Hi crafty friends and welcome back to our crafty space.
Raluca here with a new card showcasing the absolutely gorgeous "Delicate Decorations" stamp set.


I love traditional Christmas colors so I decided to create a traditional Christmas card. I went with the "Delicate Decorations" stamp set and for the colors I chose red, white and kraft.


First I stamped the ornaments in black and colored some portions of them using a red pen. I added some glitter and fussy cut them.
Next I die cut a panel from kraft cardstock using the largest stitched rectangle and mounted it to a white card base.
Then I draw some strings using a snow pen and heat embossed them. 
Next I mounted the ornaments using foam tape and white embossed a sentiment on a strip of vellum. I adhered it to the card, glued a few clear sequins and added some white dots on the kraft panel for more effect. 
Now my card was done! Super easy and very Christmassy!


Delicate Decorations


There is currently a MAIL CALL!!

We just LOVE our new office, but some more decoration would be nice... Would you like to create a smile on our faces and also see YOUR card displayed in our headquarter?

We'd love to receive some beautiful projects using Create A Smile products.

Please send them to:

Create A Smile
Merremstr. 21
47053 Duisburg
Germany

We'll of course be sharing the received projects - on Instagram, Facebook and on our blog!

Have a lovely Tuesday!
Thanks for stopping by,
Raluca